Sweet Treats – DIY Chocolate Goodies!

Valentine’s Day is coming up! If you want to make something sweet and special for someone (or yourself) fast, here’s a neat way to make a unique and decorative piece of chocolate art without piping. In fact, you won’t need any special supplies for this one! You can give it to someone as a delicious gift as is, or you can decorate other sweets with your decoration creation!

What you’ll need:
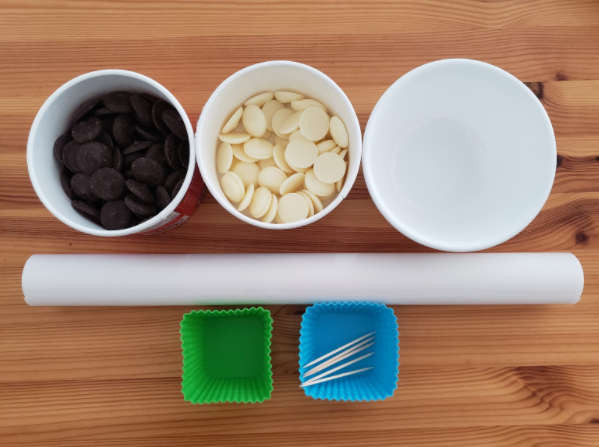
– Chocolate dark brown and white made for melting and dipping. I used melting wafers which are shaped like a coin. You can get them at a grocery store or many craft stores. You can also use chocolate chips. But I don’t recommend a regular bar of chocolate because it’ll melt very fast after taking it out of the fridge.
– Toothpicks
– Parchment paper or baking sheet
– Small bowl or silicone cup
– A bowl large enough for a small bowl to fit inside of
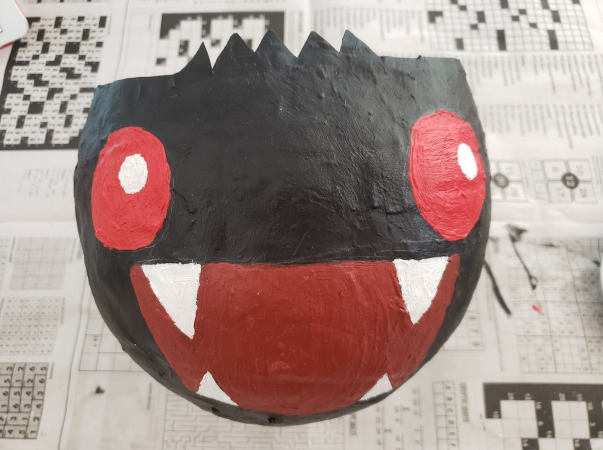
– An image or design that you want to make!

Before you begin…

Any moisture will make the chocolate clumpy and unusable for this project. Wash your hands, but make sure not to get any water in your chocolate! If you want to color white chocolate, do not use water based food coloring. Instead, use colored melting wafers or powder or oil-based food coloring. 

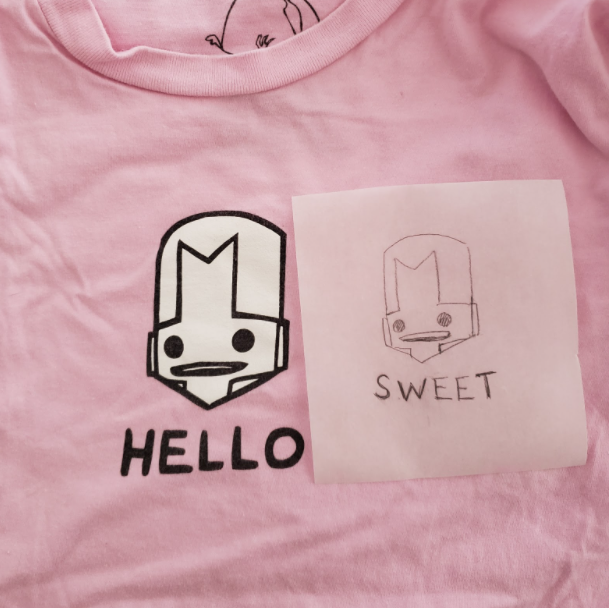
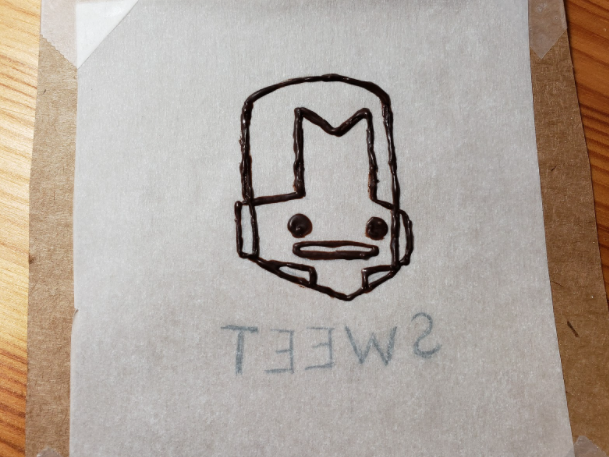
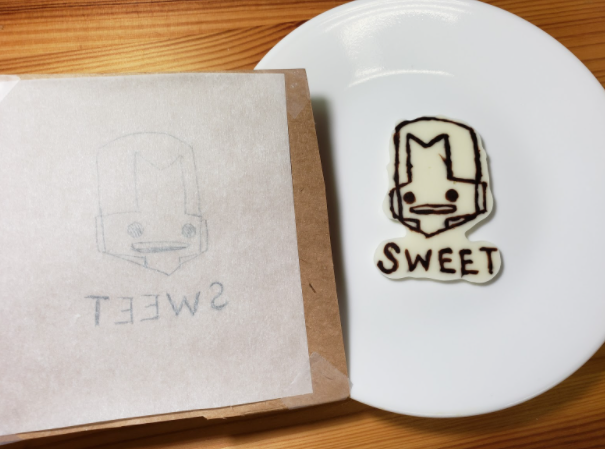
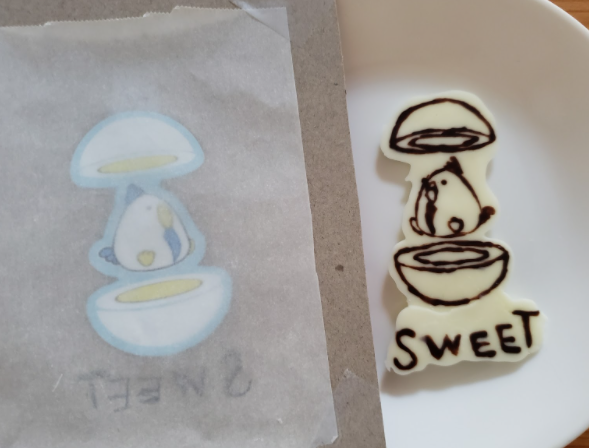
1a. If you have an image you want to draw that is on a flat surface, you can put parchment paper directly on top of it, tape down the corners, and move to Step 2. If you’re writing letters as a part of your design, make sure the letters are flipped for this method. If the material the image is on is not sturdy, slide a flat sturdy surface like a piece of cereal box or post card underneath. 

I put a Behemoth magnet on top of sturdy paper and taped the parchment paper over it.

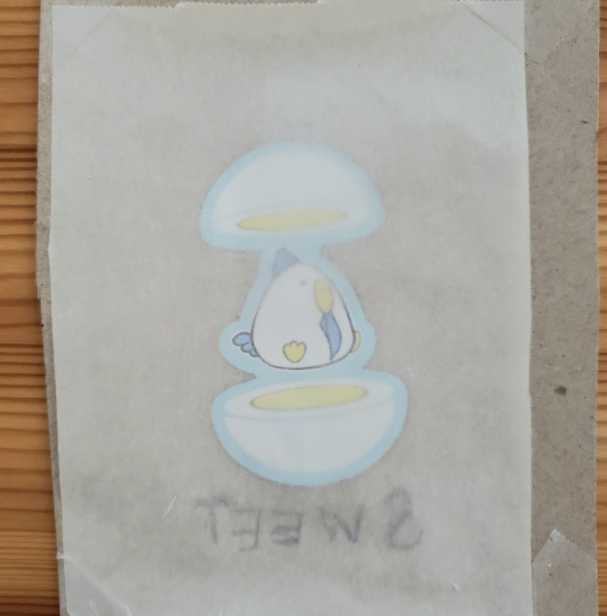
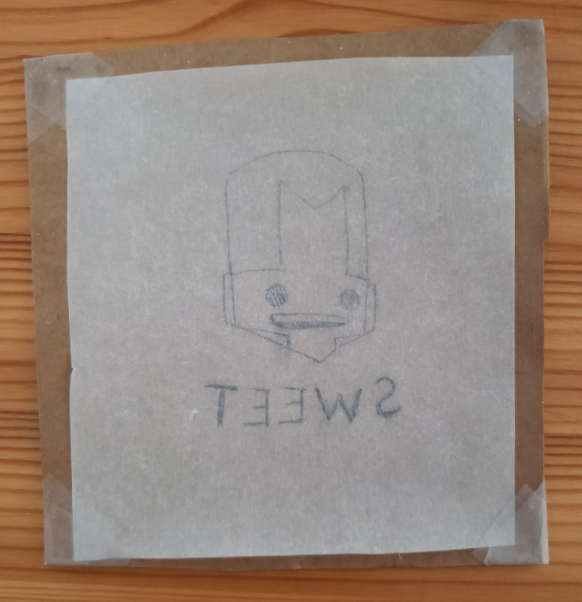
1b. If the image is too big, too small, or not on a flat surface, you can take a photo of the image and zoom in or out on your phone, or display it on a tablet or a monitor and trace it with a pencil. If words are part of your design, you don’t need to flip the letters for this method.

Then, put the parchment paper drawn side down on a flat sturdy surface like a piece of a cereal box or post card and tape the corners to it. 

I used my phone to take a picture of my shirt, zoomed out and traced it over my phone.

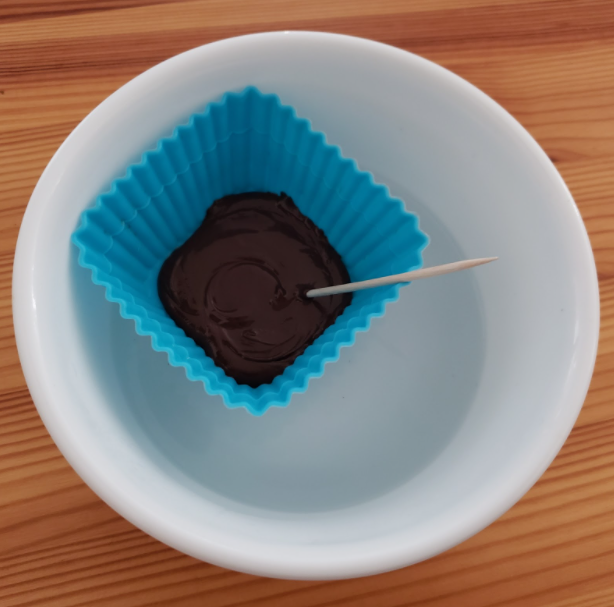
2. Boil water and pour it in a larger bowl. You’ll need it immediately after Step 3.

3. Begin melting your dark brown chocolate. You’ll only need a couple of wafers for a small image, so if you’re microwaving chocolate, microwave it for 30 seconds or less. Be careful not to burn it, because once it’s burnt, it becomes clumped and unusable no matter what you do! You can also skip microwaving and go to step 4, but it may take much longer to melt chocolate. 

4. Put a small bowl or silicone cup with your slightly melted chocolate in the larger bowl of hot water and stir chocolate until it’s smooth. Be very careful not to let water get in!

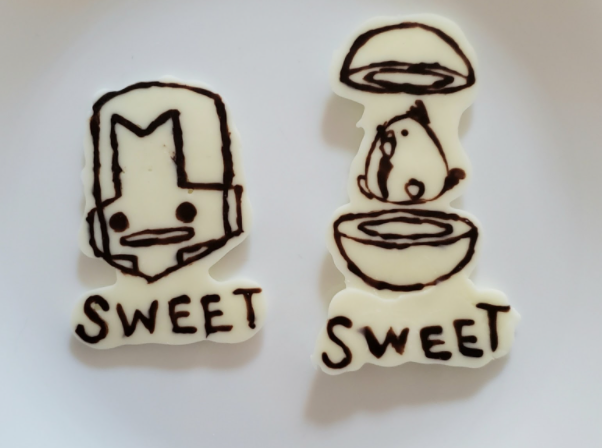
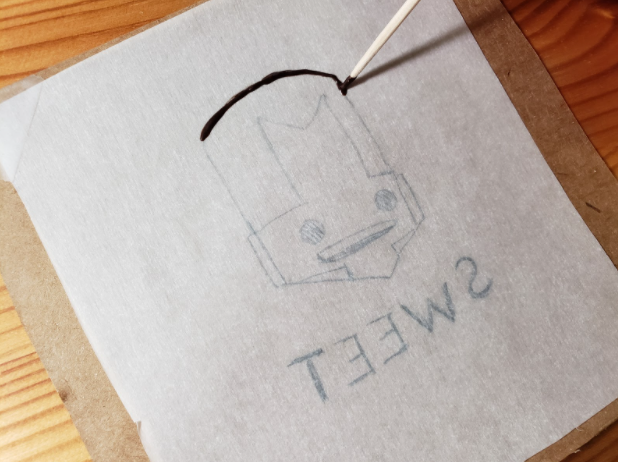
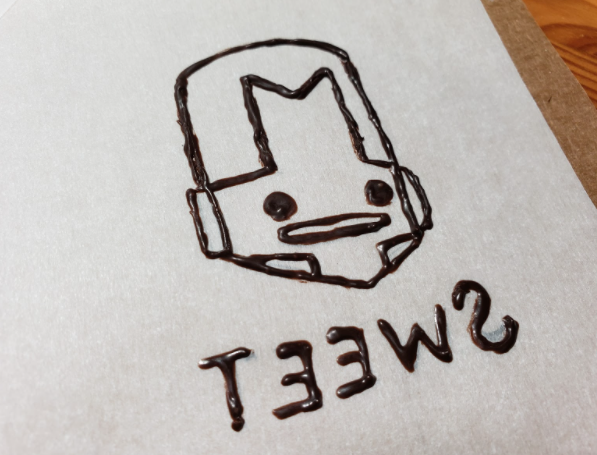
5. Dip the tip of a toothpick in chocolate, and trace the line on your parchment paper. As you can see, the line doesn’t have to be that smooth, so don’t worry if you mess up! Wait a few minutes, and scrape off your mistake with the tip of a clean toothpick, then trace the line again. If chocolate starts to get hard, change the hot water.

6. Once it’s done, carefully lift it with the parchment paper on top and place it in the fridge for a few minutes.

7.  Melt white chocolate using the same method that you used for the dark brown chocolate. You’ll need enough white chocolate to cover the entire drawing, which will be a bit more than the dark brown chocolate, so melt chocolate wafers as needed.

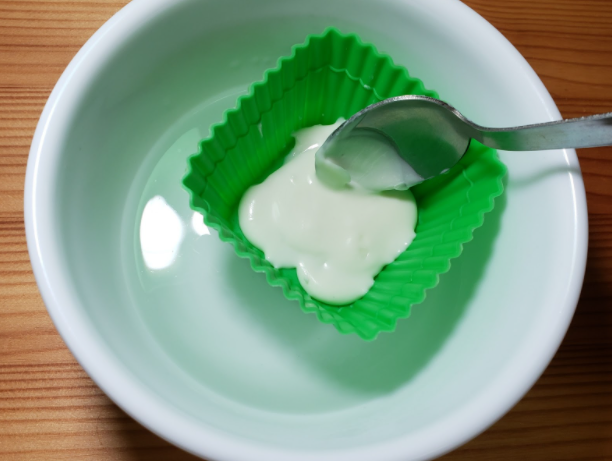
8. Scoop the melted white chocolate with a spoon and gently put drops of it on over your dark chocolate drawing. Do not try smoothing out white chocolate once it’s on the drawing or you’ll end up smudging the dark brown chocolate lines!

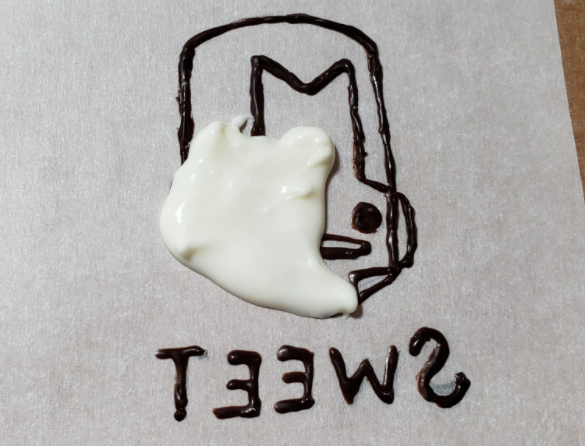
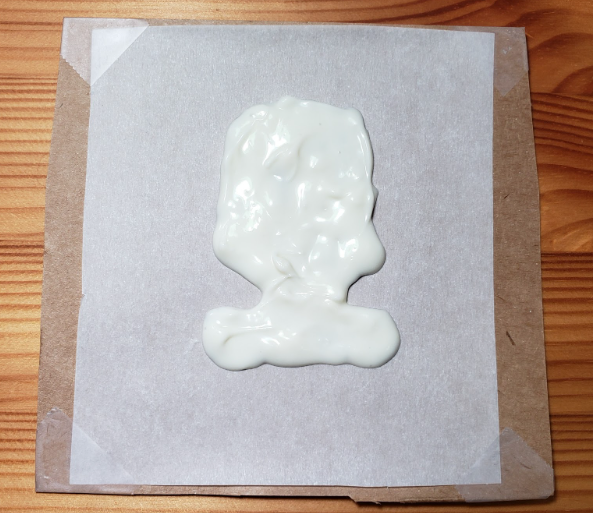
9. Put the entire thing in the fridge again for a few minutes. Once the chocolate hardens, it should come off the parchment paper very easily. Keep it in the fridge until you’re ready to use it!

Once you get a hang of it, you can experiment with colored chocolate. The possibilities are endless and SO sweet. Hope you have fun making it!

For Tricks and Treats – DIY Behemoth Candy Buckets!

Halloween might look a little bit different this year, but that doesn’t mean it can’t still be an absolute blast! We’ve been celebrating all month with decorated chickens, spooky art, and of course, the annual Behemoth Halloween contest. But we have another trick up our sleeves this Halloween!

Whether you’re looking for a place to store your candy or a fun table decoration, these DIY candy buckets are a fun craft for you to create! We’ve made them in two, erm, flavors… Bitey Bat, and Alien Hominid, so you can pick your favorite! You’re also welcome to mix things up and create a new character, of course — one of our favorite things about our fans is how creative they can be.

It might not be a pumpkin, but things are about to get a little messy on the crafting table. Let’s get started!

Base Candy Bucket

Use this as the base for either the Bitey Bat or Alien Bucket!

For basic balloon paper mache:
– Paste mix (for a balloon 7 – 8 inches wide)
● Flour: 1 cup
● Water: 1 cup + have extra water on the side
● *Salt: 1 tbsp (Optional: The salt will help prevent the paper mache from molding during time in storage)
– Balloon
– Newspaper (tear into 1-inch x 4 – 6 inch strips by hands)
– String to hang balloon dry
– A small bowl for balloon to sit on while you work on it

It’s going to get messy! Make sure you put newspapers on the surface of your work area.

1. Mix flour, water and salt. It’ll be pretty thick, so keep adding water little by little (about 1 tbsp at a time) until the mix/paste becomes the same consistency as batter. Make sure to mix it until there’s no lumps!

2. Put the balloon in an empty bowl to hold it up. Dip one strip of newspaper in the paste and soak it until it’s completely saturated. Run it through your fingers to squeeze off any excess paste, then stick the strip over the balloon and smooth it out with your fingers. Cover the balloon with newspaper strips, making sure the strips overlap in different directions. You don’t have to cover the entire balloon, just the larger 2⁄3 part of the balloon above the knot.

3. Once the balloon is covered with at least two layers of newspaper strips, tie a string under the knot of the balloon and hang it dry. I recommend putting newspaper on the floor in case the paste drips.

I did two layers without waiting for the first layer to dry. It took about 24 hours for the paper mache to completely dry. The surface got slightly bumpy, but it came out fine for a small project.

For those who are drying it before applying another layer, you can put the left-over mix/paste in a Tupperware and store it in the fridge until you do the next layer.

4. When it’s completely dry, puncture the balloon and remove it.

Now you’re ready to take your new balloon bucket to the next level! You’ve got a choice to make…

Bitey Bat Candy Bucket

Additional materials for Bitey Bat:
– Cereal box or any big box/paper that’s sturdy without being too thick
– Acrylic paint (black, white and red) & brushes
– Pipe cleaners or yarn for handle
– Masking tape or glue gun
– A box cutter or scissors

1. Start with your base bucket. Draw a zig zag line for the fur spikes on Bitey Bat’s head. From the zig zag, extended it with a straight line to wrap around the rest of the bucket. Trim with a box cutter or scissors.

2. Paint it black, then let the bucket dry.

3. Once it’s dry, paint the eyes, mouth and fangs on it. It’s much easier to draw outlines with a pencil before you start painting!

4. Cut a cereal box to create the wings and eats, and paint them black.

5. Once they’re dry, cut small lines on the inner side of the ears and wings to create flaps for attaching them to the bucket.

6. Cut slits on each side of the bucket so the ears and wings can slide in.

7. Slide the ears and wings in the bucket, fold the flaps of each piece against the inside wall of the bucket and tape or hot glue it. (I used both. I hot glued first, then taped it over.)

8. Make a small hole on each side of the bucket for the handle by puncturing with a sharp object (tip of scissors, box cutter, etc.). Then stick a pencil through it to make the hole bigger. Attach your string or pipe cleaner handle — I connected three pipe cleaners to make one handle for this Bitey Bat bucket.

If looks could kill, Bitey Bat most certainly would. Chomp!

Alien Hominid Candy Bucket

Additional materials for Alien Hominid:
– Cereal box or any big box or paper that’s not too thin or too thick
– Acrylic paint (black, white and red) & brushes
– Masking tape or glue gun
– A box cutter or scissors

1. Start with your base bucket. Trim the top part with a box cutter or scissors to make it straight and flat.

2. Paint the bucket yellow, then let it dry.

3. Draw outlines for eyes and mouth with a pencil very lightly. It makes it a lot easier to balance the eyes and mouth out if you cut a circle of paper for the eyes.

4. Paint eyes and mouth on, and let dry.

5. Cut a piece of paper to act as a stencil for sparkles in the Alien’s eyes, then draw a line around it and paint them white.

6. Make a small hole on each side of the bucket for the handle by puncturing with a sharp object (tip of scissors, box cutter, etc.). Then stick a pencil through it to make the hole bigger.

7. Attach your string or pipe cleaner handle. For the Alien, I made a yarn handle. To keep it in place, I made a big knot with yarn inside the bucket, but if you think the knot is too small or the hole is too big and are afraid of it slipping out you can wrap tape around the end of the yarn.

8. Cut a cereal box into 4 small circles of the same size, and paint them yellow. It’s okay to just paint one side of each!

9. Hot glue the non-painted side of a circle piece to your handle, and put another circle on the backside.

Now you’ve got a picture perfect Alien ready to invade!

With these guys, you’ll be ready for any Halloween plans you have! If you make your own Behemoth Candy Bucket, be sure to share it with us on Twitter or Instagram! Happy haunting!